Title here
Summary here
With this page, you will know what is a RecyclingListView and how to use it.
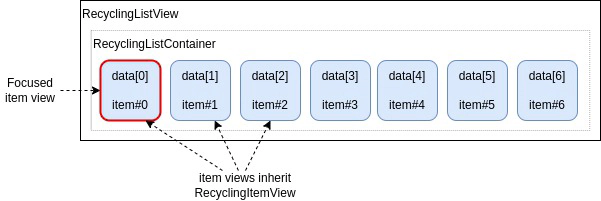
Under Dana, a RecyclingListView is a component that allows to show a horizontal or vertical list of views, with the purpose to navigate through them.
Unlike the ListView, it will only create a limited number of views (called item views), regardless of the number of data set in it.
These item views are contained in a RecyclingListContainer’s view which allows to move all item views at once when navigating through the list data.
A newly built RecyclingListView with 40 data will look like:
The item views created by the list will be “recycled” during the navigation to show other data. The method next() and previous() are allowing us to focus the next/previous item in the list.
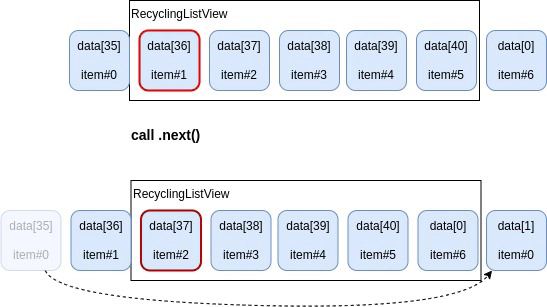
From the above state, two consecutive calls to next() will result in:
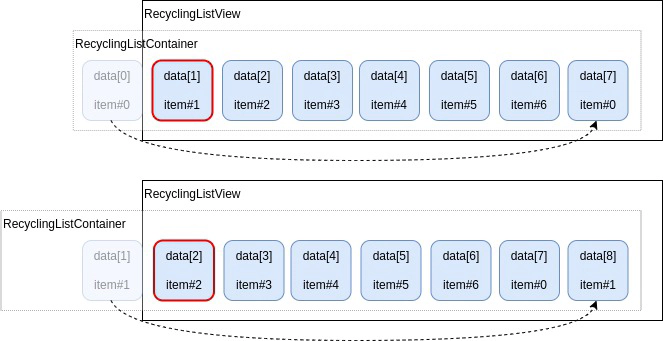
During the first next() action:
During the second one, the item#1 is recycled to show data[8] and the container is moved again.
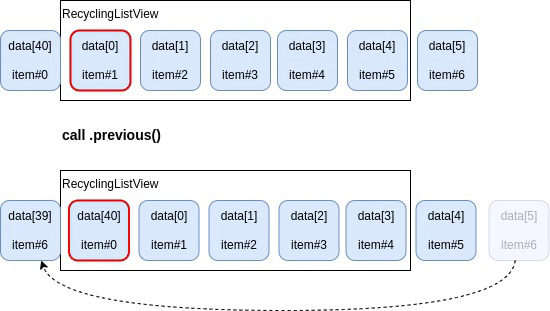
This will work the same way when calling previous() method:
_setData method which maps the data to the view.RecyclingItemView.prototype.declare("MyTileView", {
children: {
backgroundImage: {class: $ImagePrimitive}
},
style: {
width: 320,
height: 180,
backgroundImage: {
width: 320,
height: 180
}
},
methods: {
_setData: function (data, index) {
this.backgroundImage.url = data && data.imageUrl;
}
}
});children: {
myList: {
class: $RecyclingListView,
itemViewClass: () => $MyTileView,
directionType: $DirectionType.HORIZONTAL, // optional, default value is horizontal
itemMargin: 20 // margin between item views
}
},
style: {
myList: {
x: 200,
y: 200,
width: 1000,
height: 180
}
}methods: {
onKeypressLEFT: function (key) {
this.myList.previous(key);
},
onKeypressRIGHT: function (key) {
this.myList.next(key);
}
}Caution
Don’t forget to pass the key parameter to navigation function
methods: {
    connectData: function (data) {
        this.myList.setData(data.listData);
    },
    onKeypressOK: function (key) {
        console.log("The data currently focused in my list is", this.myList.dataItem);
        console.log("The currently focused index is", this.myList.index);
    },
    focusSpecificData: function (index) {
        this.myList.selectItem(index);
    }
}You can set the direction by setting directionType property which can be either $DirectionType.HORIZONTAL or $DirectionType.VERTICAL.
Default direction is horizontal.
You can set the margin that the list must leave between two item views. This can be set with the itemMargin property.
By default, there is no margin.
You can set the navigation type by setting navigationType property with one the available navigation classes.
Default navigation is $FixedNavigationType.
navigationType: () => $LMRNavigationType
The focus starts on the left side on the list, then goes on the right and stay in the middle, then goes to the right side when the list end.

navigationType: () => $LMRNavigationType focusOffset: 200
It works the same as above LMR’s navigation, but you can fix the “middle” point where you want by setting the focusOffset property of your RecyclingListView. The recycling List will keep the focused item at this focusOffset position as long as there is enough items before/after the focused one to fill the RecyclingListView viewport.
Note that the focusOffset value will be the space left between the left side of the RecyclingList viewport and the left side of the focused item.
navigationType: () => $LRNavigationType
The focus moves in the direction pressed, until it reaches the left/right side of the list. At this moment the list will scroll to show new items.

navigationType: () => $FixedNavigationType
The focus is fixed on the left side of the list.

navigationType: () => $PaginateNavigationType
The focus moves along the visible items. When it reaches one side of the list, all item views are replaced with the new one.

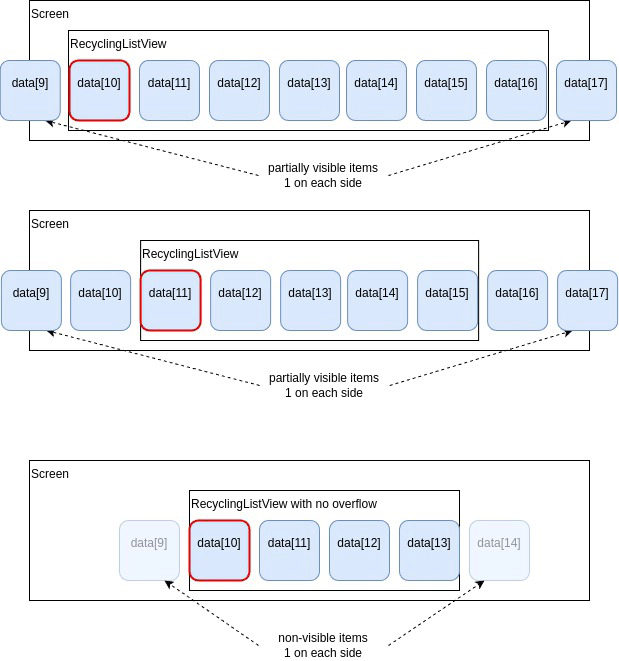
The number of item views created by the RecyclingListView is managed by both properties nbViewBefore and nbViewAfter.
These properties are useful to have “preloaded” item views out of the viewport of the list/screen.
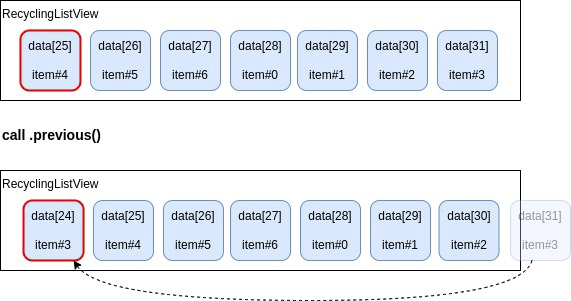
Here is an example with a RecyclingListView set with nbViewBefore: 1, nbViewAfter: 5 and index: 26:

When previous() is called, the container will slide to the right to show and focus the item#4/data[25] which was already loaded in the previous state before the move.
For performance issues, you should always set the minimum possible number of item views, according to the configuration and visual positioning of your list within its screen. Usually you need only one non-visible, or partially visible item on each sides of the list. The total number of items will of course depends on how the list is set in a screen : it can occupy all screen, it can be configured with no overflow, or inside a bigger container with no overflow…
Also, nbViewBefore and nbViewAfter values will strongly depend on the navigationType of the list.
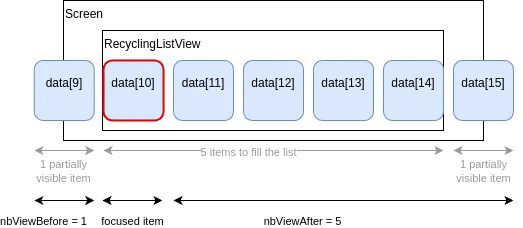
For FixedNavigation, the focus is always at the left/up-most position in the list :
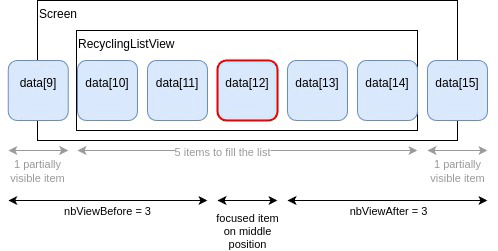
For LMRNavigation, you must consider the case were the focus is in its “middle” position.
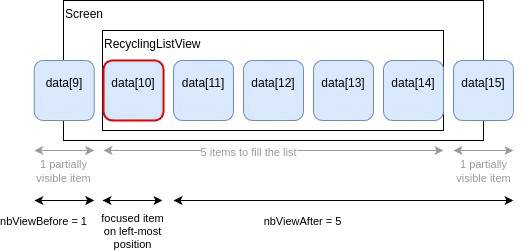
For LRNavigation, you must consider the case where the focus is at the left/up-most position in the list.
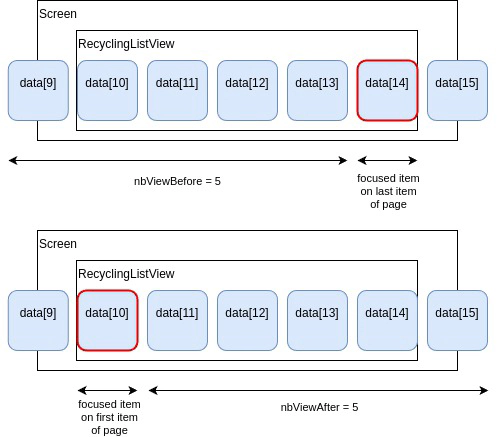
For PaginateNavigation, we need more item views than with the other navigation. To configure nbViewBefore, consider the case where the focus is on the last item of a page. To configure nbViewAfter, consider the case where the focus is on the first item of a page.
You can set your list as a cyclic list with the boolean property named cyclic.
Default value is false.
A cyclic list will allow you to navigate before the first item or after the last one by repeating the data indefinitely.
Here is an example of calling previous() on a cyclic List:
Here is another example of calling next() on a cyclic List:
Caution
If the number of data is lesser than the number of created item views, then the list can’t be cyclic as it doesn’t allow to have the same data in two different item views.
For example if we have only 5 data but the list should have 7 item views (1 before, 5 after):
The first solution can’t be managed by the RecyclingListView. It will instead create only 5 views and be non-cyclic.
The RecyclingListView allows to keep track of a “selected data”. The index of this selected data is stored in the selectedIndex property.
This can be useful, for example, in a menu view, where you can move the focus between menu items, but it will still need to keep track of the currently selected menu entry. By calling the method ok() on the list, it will make the currently focused item as the “selected item”.
RecyclingListView_doc-Item-selection
The boolean property focusedSelectedIndex adds some behavior when it is set to true (default value is false):
setData()), the selectedIndex item will be automatically focused.The number property named throttleValue represents the throttle duration between 2 next() or 2 previous() calls in ms, to prevent too much call to recycling() in a short time (default value is set to 0).
The best way to prevent “grinding” effect when the list is moving fast, is to set the throttleValue to 100ms and the container’s transition to 100ms.
properties: {
    throttleValue: 100
},

transitions: {
    "container.x": {
        duration: 100
    }
}
The boolean property skipTransitions allows the list to skip transition on container in order to have no animation when moving it (default is false)
Caution
If you add transitions on your items, the skipTransitions property has no effect on them.
The number property longAnimationDuration is the container’s transition duration on long pressed key (default is 100) Inside the RecyclingListView, the container’s transition duration is set to 350ms by default. You can override it in “transitions” declaration but during a long pressed key, this transition is set with longAnimationDuration value instead. The property longEasingFunction is set to an easing function during the long key pressed function too.
properties: {
    throttleValue: 100,
    longAnimationDuration: 100,
    longEasingFunction: () => $Easing.linear
},

transitions: {
    "container.x": {
        duration: 250,
        easing: $Easing.easeOutQuad
    }
}
During long key pressed, the container transition is overrided with longAnimationDuration and longEasingFunction.
The number property debounceDelayFocusSelectItem is the delay before the focus selected item is set after a long key pressed call (default is 150ms)
You can set it to 0 to ignore the debounce function on selectItem.
By default, the recyclingListView has a debounce function on selectItem to prevent too much item.focus() calls during long key pressed events.
During long press, itemView are not “focused”, and when the list stops moving, the current item is focused after a debounceDelayFocusSelectItem delay.
Caution
If your RecyclingListView is not focused, and you need to move it, then you can have an issue with the debounce function because your list will be automatically focused after long key pressed.
Then you probably should override the function __selectItem as below:
__selectItem: function (options, previousIndex) {
     this.focusedChild = this.container;
     this.container.focusedChild = this.$$currentView;
}By default, a RecyclingListView manages only one type of item view instances (of the same class) which is the one set in the itemViewClass property.
But you will sometimes need to use different item view class, or different configurations of the same item view class, to show different kind of contents. To do so, the RecyclingListView allows to manage different pool of item view instances, according to the data you want to set in it.
In the following example, we have 4 kinds of data and therefore 4 different item view classes: MovieItemView, ProgramItemView, ApplicationItemView, DeeplinkItemView.
Moreover, the MovieItemView class can have two different layout: poster or landscape.

Caution
You must have your own class that inherits from RecyclingListView to manage variable item view instances. Then you must just override the _getItemViewLayout(itemData) method. This method will get one item data as a parameter and must return the item view layout to use for that data.
The item view layout is an object containing a layout identifier (id) and the item view class (itemViewClass) associated to that layout.
For example:
| _getItemViewClass |
|---|
| ```javascript _getItemViewLayout: function (itemData) { if (itemData.isMovie) { if (itemData.images.isPoster) { return {itemViewClass: $MovieItemView, id: $TileFormat.MOVIE_POSTER}; } else { // default to landscape return {itemViewClass: $MovieItemView, id: $TileFormat.MOVIE_LANDSCAPE}; } } else if (itemData.isProgram) { return {itemViewClass: $ProgramItemView, id: $TileFormat.PROGRAM}; } else { return {itemViewClass: $TileItemView, id: $TileFormat.DEFAULT}; } } ``` |
Caution
The RecyclingListView relies on the item’s view layout id property to know which item’s view instance can be recycled. Each configuration of instance must have a unique identifier.
When we call next() or previous() method, the RecyclingList will first determine the layout of the new item to show.
The layout of the item view to show, can be the same as the one to recycle. In that case, the list will simply recycle it, as usual:
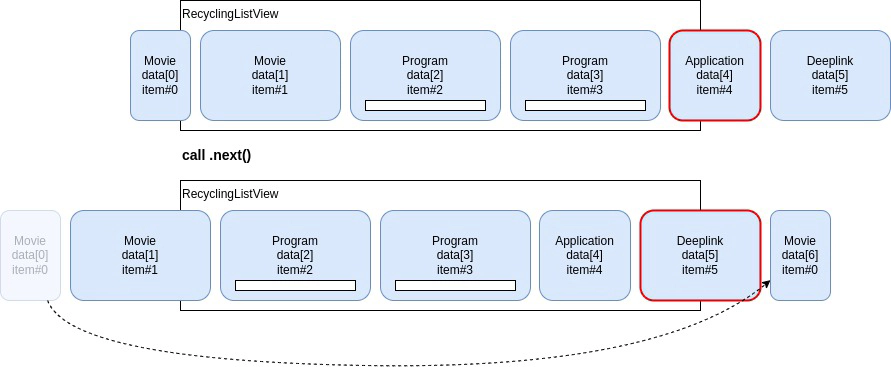
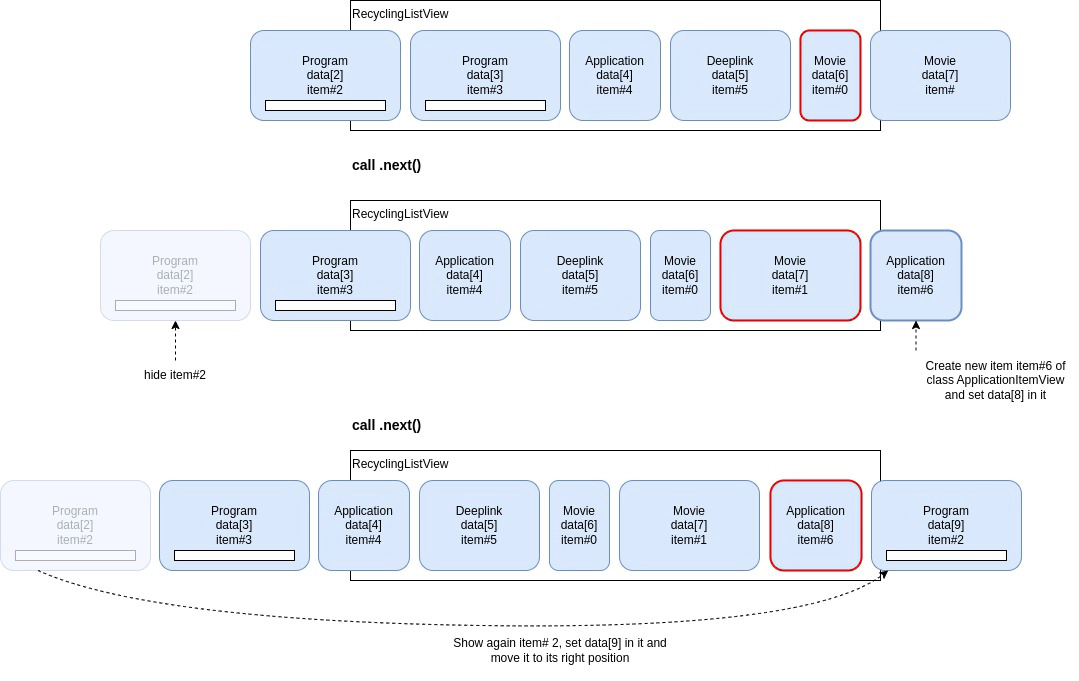
When the layout to show, is not the same as the one to recycle:
The list keep tracks of which item views are hidden and therefore also those that are available to use later.
When the layout to show is not the same as the one to recycle, and an item view of the right layout is available:
This UI component is part of Dana’s vendor named wtv-vendor-components which includes a JSdoc description.
See the component RecyclingListView under views category of this components API.